2.2 General information about Mext platform features.
2.2 General information about Mext platform features.
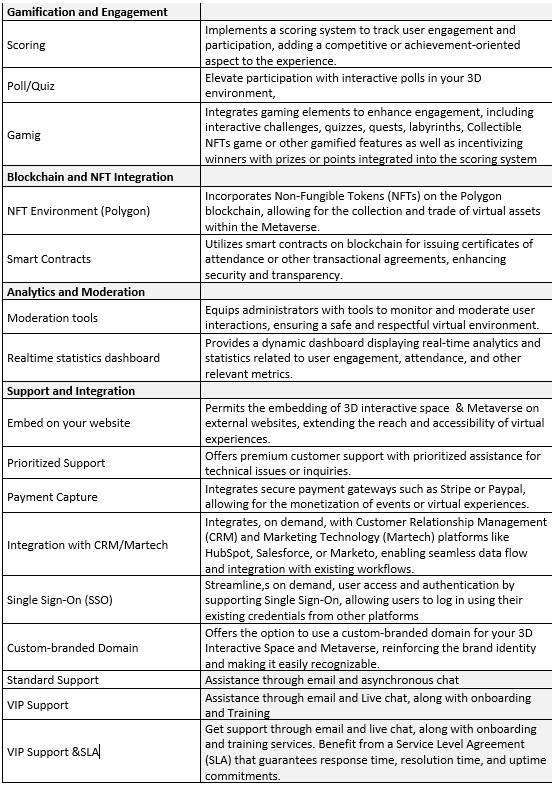
2.2.1 What are the main features of Mext Platform?
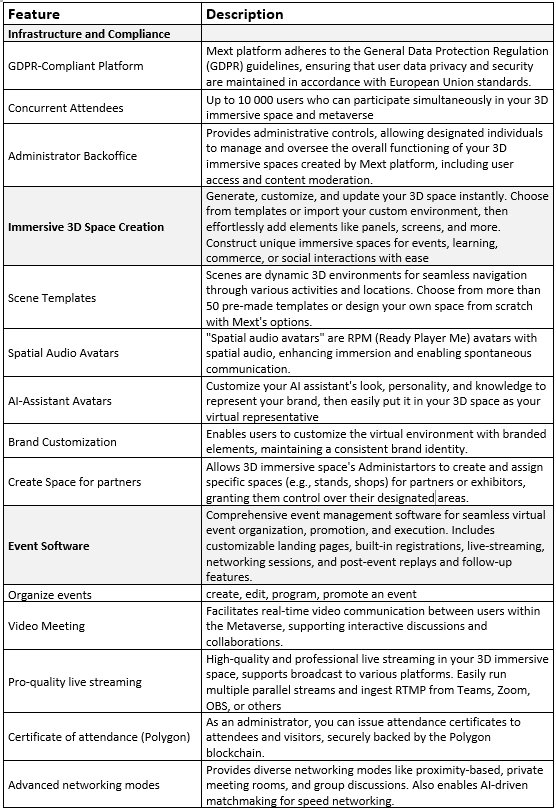
2.2.2 What is the maximum number of concurrent participants allowed in my metaverse?
The number of concurrent participants varies based on your plan with the Mext platform:
- Freeverse: Up to 10 participants
- Explorer: Up to 100 participants
- Professional: Up to 1,000 participants
- Enterprise: Up to 10,000 participants
2.2.3 Can I make my Metaverse private or public?
Mext provides flexibility in managing your Metaverse's accessibility through public and private modes:
- Public Mode: Your 3D immersive space and metaverse are visible on the Mext website, your website, or any other website where you've embedded it. Anyone can enter without restrictions, fostering open exploration and engagement.
- Private Mode: Limit access by switching to private mode. Only individuals with the specific link and registration as visitors can enter. This ensures exclusivity and controlled access to your virtual environment.
By toggling between public and private modes, you control who engages with your Metaverse. Public mode maximizes visibility, while private mode offers a more exclusive experience. Switch between modes as needed for your project's requirements.
2.2.4 Is it possible to switch to a different Mext plan?
Yes, you can change your Mext metaverse plan at any time. Upgrading allows you to access additional functionalities without losing any progress made, as long as you stick to the same template.
2.2.5 Am I able to switch to a different template?
Yes, you can change templates. However, it's important to note that switching templates will result in losing any progress made on the previous template.
2.2.6 Does the Mext platform provide white-label solutions?
Absolutely. The Mext platform offers white-label options for users seeking to tailor the platform to their branding specifications. Leveraging existing white-labeling features, you can seamlessly integrate your branding elements like logos, colors, and transactional emails into the platform.
For further exploration of white-label options, including custom domain names, and to discuss personalized customization possibilities, we advise reaching out directly to the Mext team. Feel free to contact them at contact@mext.app to inquire about white-label solutions tailored to your unique requirements and preferences.
2.2.7 Can we host our Metaverse on our local server?
Yes, Mext provides the option to host your Metaverse on your own local server. This offers greater control and flexibility over the hosting environment, enabling you to meet specific security or infrastructure needs.
Feel free to contact the Mext team at contact@mext.app to discuss your specific hosting requirements and find the best solution for your organization.
2.2.8 What does End-to-End white labeling mean?
End-to-end white labeling entails fully customizing and branding a product or service with the identity of another company. In the context of the Mext platform, it means that every aspect of the Metaverse experience, from the user interface and features to domain/subdomain and design, can be tailored to reflect the branding and identity of your organization. Additionally, you have the potential to migrate your Metaverse, built on the Mext platform, to your preferred cloud and infrastructure.
2.2.9 How can I create a landing page for my 3D immersive space and metaverse?
To create a landing page for your 3D immersive space and metaverse, simply fill out the form in the Administrator Backoffice under 'Landing Page Creator'. Once completed, you can easily embed this landing page on your website or any other platform, and share its link to attract visitors."
2.2.10 What is the limit on the number of administrators I can add?
The number of administrators you can add depends on your plan with Mext:
- Freeverse: 1 administrator
- Explorer: Up to 3 administrators
- Professional: Unlimited administrators
- Enterprise: Unlimited administrators
2.2.11 Can I have customized registration form for my metaverse?
Absolutely! With Mext, you have the flexibility to create a customized registration form to gather specific information from participants that is relevant to your business or event. This can be done easily from your Organizer Backoffice by accessing the Registration Form creator section.
Initially, participants will register with basic information such as their name, surname, and email address. However, upon their first entry into the Metaverse, they will be prompted to complete the additional form you have created. This allows you to gather more detailed information tailored to your requirements.
2.2.12 What kind of statistics are available on the Mext platform?
Within the Mext platform, you have access to a wide range of statistics that offer insights into various aspects of your Metaverse, events, and participants. These statistics cover multiple dimensions and enable you to evaluate the effectiveness of your activities. Here's an overview of the key areas where you can gather statistics:
1. Metaverse Statistics:
- Registration Form Completion: Track participant completion of registration forms to understand the data collected.
- Unique Visitors and Visits: Monitor the number of unique visitors and their visit frequency to gauge engagement.
- Time Spent in the Metaverse: Measure average participant time spent in the Metaverse to assess interaction levels.
- Communication Activities: Track the volume of messages, calls, and meetings to gauge participant engagement and networking.
2. Partner Spaces and Exhibitors Statistics:
- Analyze participant behavior and engagement within specific partner spaces and exhibitor booths to identify popular or active areas.
3. Visitor Statistics:
- Gain insights into visitor interactions, including interactivity levels, geographic origins, and other relevant metrics, to tailor offerings based on audience preferences.
2.2.13 Can I personalize my 3D immersive space and metaverse?
Absolutely! With Mext's innovative Metabuilder technology, personalizing your 3D immersive space and metaverse is both simple and limitless. Here's how it works:
- Metabuilder Technology: Utilize Mext's Metabuilder technology to craft your space from scratch or choose from a selection of Scene Templates.
- Customization Options: Add your own 3D models from the Metabuilder Store or import your own assets. Once added, you have complete control to resize, position, and manipulate the 3D models, even adding motion.
- User-Friendly Interface: With intuitive drag-and-drop actions and a few clicks, transform your space into a dynamic, branded experience.
- Endless Possibilities: The creative possibilities are endless, allowing you to design your space exactly as you envision it, without any limitations.
2.2.14 What sets apart a Scene Template from a 3D model?
A Scene Template, found in the Mext Metabuilder store, embodies a fully realized 3D environment upon selection, serving as a ready-to-use scene that can be customized. Conversely, a 3D model refers to an individual object, building, or any other 3D illustration that can be incorporated into a Template.
2.2.15 What format and size Mext Platform support?
Waiting for Fabien/Hubert inputs
2.2.16 Is it possible to switch scenes?
Yes, you can change scenes. However, it's important to note that selecting a new scene will result in the loss of any modifications made to the previous scene.
2.2.17 How many distinct scenes can I create?
- For the Freeverse plan, you can create only 1 scene.
- With the Explorer plan, you can have up to 5 scenes.
- The Professional plan allows for up to 10 scenes.
- For Enterprise users, the number of scenes depends on the specific project requirements and needs.
2.2.18 What's the process for creating multiple scenes?
To create multiple scenes, start by purchasing the appropriate plan from Mext: Explorer, Professional, or Enterprise. Once you've done that, access your Metaverse Admin Backoffice and navigate to "Manage scenes" to initiate the scene creation process.
2.2.19 How can visitors access different scenes within the Metaverse?
When visitors enter your Metaverse, they'll initially encounter the scene you've designated as the default in the Admin Backoffice's "Manage scenes" section. To navigate to a different scene, they can click on the "3 dots" scrolling menu located at the top left of their screen. From there, they select the "Go To" button to choose the scene they wish to teleport to. This instantly transports them to the new scene. Additionally, administrators can incorporate teleporting items within scenes, seamlessly guiding visitors to other parts of the metaverse as part of their journey.
2.2.20 How can I view the changes made in the Metabuilder within the Metaverse?
To see the modifications made in the Metabuilder reflected in the Metaverse, click on the "Enter Metaverse" button located on the top menu of your Metaverse platform. This action will open a new browser window, enabling you to navigate with your avatar within your 3D immersive space, similar to any other visitor. Here, you can observe firsthand how your modifications appear.
2.2.21 Are all models in the store free to use?
Yes, unless explicitly stated otherwise as a paid model.
2.2.22 Will other users be able to access models that I import?
No, other users will not have access to the models you import and add to your "My Imported Models" and Metaverse. These models remain exclusively accessible to you.
2.2.23 Is it possible to sell 3D models and Templates on the Mext platform?
Absolutely! You can sell your 3D models and Templates on the Mext platform. For more information, reach out to Mext at contact@mext.app.
2.2.24 Is it possible to sell the Metaverses I design on the Mext platform?
Absolutely! You can sell and even promote your Metaverses on the Mext platform. To promote your Metaverses for sale, please contact Mext at contact@mext.app.
2.2.25 Is there a limit to the number of 3D models I can add?
Mext platform doesn't impose specific limitations on the number of 3D models you can add. However, it's crucial to consider the user experience. Adding more models increases your Metaverse's size, which may pose navigation challenges for visitors within your 3D immersive environment. Be mindful of maintaining a balance to ensure smooth navigation and a seamless user experience.
2.2.26 Is it possible to resize a 3D model?
Absolutely! You can resize a 3D model easily. Just utilize the "scale" button positioned on the top menu to the left of your Metabuilder screen.
2.2.27 Can I modify a 3D model?
Yes for colors and size ! but if you want to change the structure of 3D, you need to rework it on a 3D design software like “Blender” and then import the new version to Mext platform
2.2.28 How can I access 3D models for use in my project?
various methods to acquire 3D models for your use within the Mext platform. Here are some options you can consider:
1. Mext Platform: You can explore the available 3D models directly within the Mext platform. There may be a selection of pre-existing models that you can use for your purposes.
2. 3D Model Platforms: Websites like Sketchfab (https://sketchfab.com/) offer a wide range of 3D models, both free and paid. You can browse through their collection and choose models that suit your needs. These platforms often have a diverse range of objects, characters, and environments to choose from.
3. LiDAR Scanning: If you have access to an iOS device with a LiDAR scanner, you can generate 3D models by scanning real-world rooms or objects. The LiDAR scanner technology captures depth information, enabling you to create accurate 3D representations. Other scanning methods and devices may also be available depending on your specific requirements.
4. Custom Creation: If you have engineers or architects working on your products or buildings, they created or can create 3D models tailored to your specific needs. This option ensures that the models are designed to perfectly represent your products or architectural designs.
5. Hiring a Designer: If you have specific requirements or need a custom 3D model, you can consider hiring a professional designer or 3D artist. They can create tailored 3D models based on your preferences and specifications. This option allows you to have unique and personalized 3D assets for your use within the metaverse.
Ensure that any 3D models you acquire are compliant with Mext's technical requirements for seamless integration into the metaverse environment. Evaluate each option based on your needs and resources to make the best choice for your project.
2.2.29 How can I make a 3D model from my physical product or object and ported to Mext platform to use it in my metaverse ?
To do , you need to follow Melek’s AN
2.2.30 How can I make 3D model of my building ?
2.2.31 How to improve a 3D model ?
To do , you need to follow Steve’s AN
2.2.32 What are 2D elements ?
2D elements encompass panels, video players, and screen sharing features that you integrate into your 3D immersive environments and metaverses. They enable you to display images, posters, videos, or allow visitors to share their screens seamlessly.
2.2.33 How can I incorporate a poster, image, or advertising panel into my 3D immersive experience or metaverse?
To add these 2D elements, access your metabuilder and click on the "+" button situated at the top left corner of your screen. From there, select "2D elements" and then choose panel.
2.2.34 How can I integrate a video into my 3D immersive environment or metaverse?
To add a video, simply access your metabuilder and locate the "+" button positioned at the top left corner of your screen. Next, select "2D elements" and opt for the video player option.
2.2.35 How can I incorporate a screen for livestreaming sessions into my 3D immersive space or metaverse?
To set up a livestreaming screen, first add a video player element to your space and then configure it accordingly. Navigate to your metabuilder and find the "+" button in the top left corner of the screen. Choose "2D elements" and select the video player option to get started.
2.2.36 How can I enable screen sharing within my 3D immersive space or metaverse?
To initiate screen sharing functionality, access your metabuilder and locate the "+" button at the top left corner of the screen. Then, select "2D elements" and opt for the screen sharing option to add a screen sharing.
2.2.37 How can visitors share their screens in my 3D immersive space and metaverse?
To enable screen sharing for visitors, you'll need to incorporate screen sharing functionality within your space. Access your metabuilder and find the "+" button at the top left corner of the screen. Choose "2D elements" and then select the screen sharing option to add this capability.
2.2.38 How can I add my own 3D models to my 3D immersive space and metaverse?
To incorporate your own 3D models, ensure they're in GLB or FBX format and have a picture as a thumbnail. Next, navigate to the Metabuilder interface and click the "+" button located at the top left corner. Then, choose "Import my models". By clicking on the square with dashed lines, you can begin importing your 3D model.
2.2.39 How can I import my 3D model template of my 3D immersive space and metaverse ?
If you want to have your template …
2.2.40 How can I manage if have a rendering problem with my imported 3 model or my 3D environment ?
Steve + Fabien
2.2.41 The quality of my imported 3D model is different from before importation. What is the problem? How can improve the imported model ?
Steve + Fabien
2.2.42 How can I redirect visitors from my 3D immersive space and metaverse to another metaverse or website?
To redirect visitors to another metaverse or website, you'll need to create a teleportation portal within your 3D immersive space and metaverse. This portal embeds the link to the other metaverse or website. To create a teleportation portal, navigate to the Metabuilder interface, and click the "+" button at the top left corner. Then, select "Teleportation portal.
2.2.43 How can visitors teleport between scenes in my 3D immersive and metaverse?
Visitors can teleport between scenes by clicking on the "3dots" button at the top right of their screen, then selecting the "Go to" button and scrolling down to choose the desired scene. Additionally, administrators can create teleportation portals that embed scene links for easier navigation.
2.2.44 How can I redirect visitors within my 3D immersive space and metaverse to a PDF document?
To provide access to a PDF document or redirect visitors to one, you'll need to first make the PDF available via a link. Then, create a "Teleportation portal" within your 3D immersive space and metaverse, embedding the link to your PDF document. To create a teleportation portal, navigate to the Metabuilder interface, click the "+" button at the top left corner, and select "Teleportation portal".
2.2.45 How can I direct visitors within my 3D immersive space and metaverse to another link?
To direct visitors to a specific link, create a teleportation portal within your 3D immersive space and metaverse. This portal will embed the specific link you want to direct them to. To create a teleportation portal, navigate to the Metabuilder interface, click the "+" button at the top left corner, and select "Teleportation portal".
2.2.46 How do I create a teleportation portal within my 3D immersive space and metaverse?
1. Navigate to the Metabuilder interface and click the "+" button at the top left corner to initiate the creation of a teleportation portal.
2. This action generates a teleportation sphere. Adjust its size and position by accessing the Element menu at the top right of the Metabuilder, treating it like any other 3D model.
3. Within the teleporter's settings, accessed through the "Black window" associated with the new element, input the redirection link. Additionally, fine-tune detection sensitivity and specify precise coordinates for the teleportation zone.
4. With these steps completed, a redirection zone will be immediately available within your 3D immersive space and metaverse, seamlessly guiding participants to their intended destinations.
2.2.47 How can I create a shortcut to a specific zone within my 3D immersive space and metaverse?
You can empower visitors to access shortcuts directly by guiding them to click on the "3dots" button at the top right of their screen. From there, they can select the "Go to" button and scroll down to choose from the shortcut locations you've made available.
To create shortcuts for visitors to access specific zones:
1. Begin by clicking on the "+" icon in the element management bar at the top left corner of your Metabuilder screen. From the dropdown menu, select "Go to shortcuts".
2. Upon clicking, you'll be prompted to name the teleportation zone you wish to create.
3. After naming the teleportation location, click on "Add New Go to short cut". This action will reveal three directional arrows.
4. Move the directional arrows to the desired location where you want to establish your shortcut.
2.2.48 What distinguishes a shortcut from a teleportation location?
A shortcut, also known as a "Go to shortcut," is a zone created by the administrator. Visitors can directly access it through the "Go to" button without needing to navigate with their avatars. On the other hand, a teleportation location serves as a point where visitors can be instantly transported outside the current 3D immersive space and scene. This could mean transitioning to another scene within the metaverse, entering a different metaverse, or accessing any other digital environment reachable through a link.