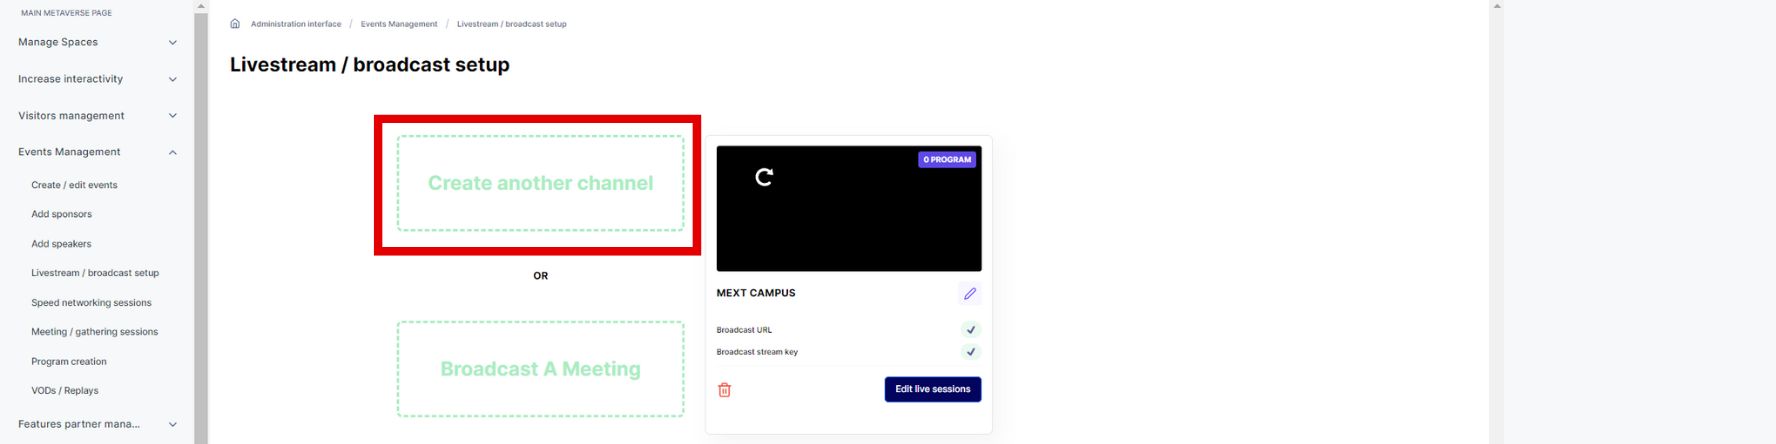
Create a channel
How can I add a new channel for streaming?
- Click on “Create another channel”

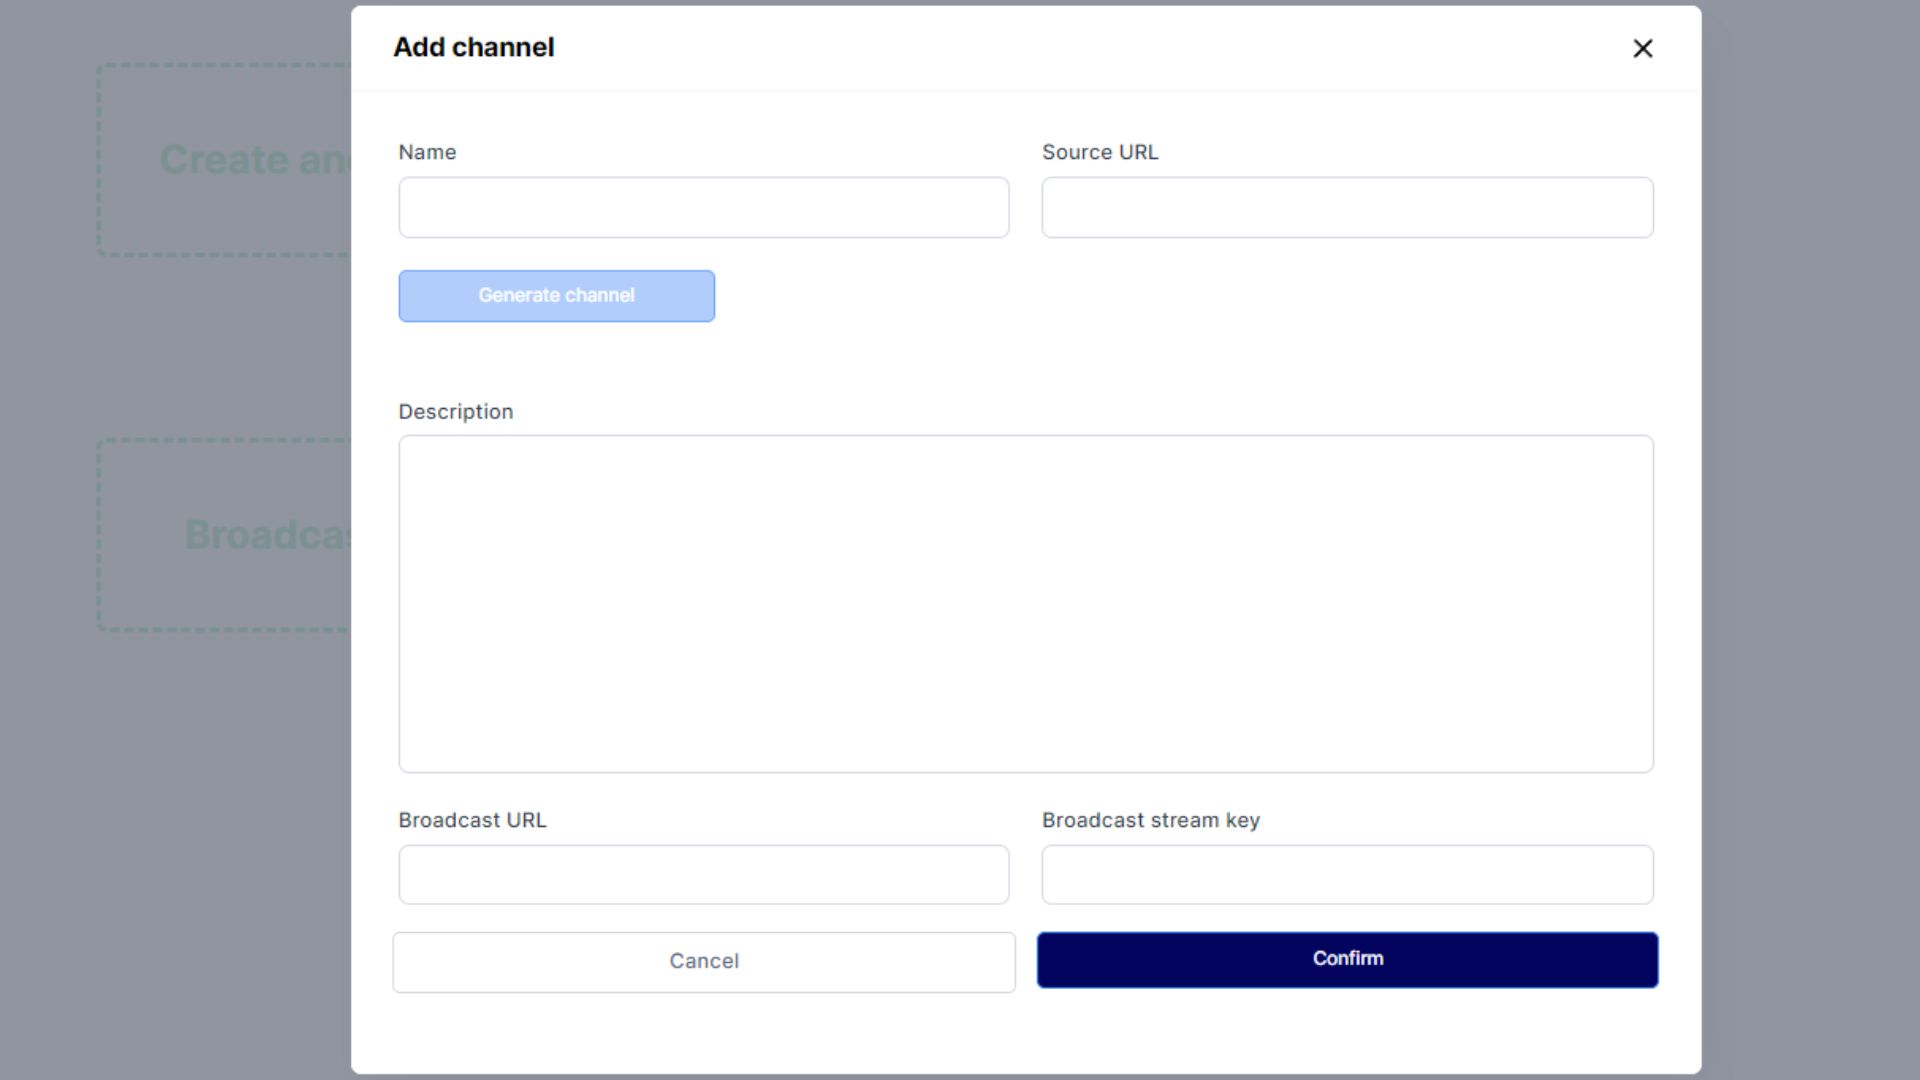
To effectively set up your channel, follow these steps:
1. Channel Name: Include a distinctive name for your channel to provide clarity and attract viewers.
2. Channel Description: Craft a compelling description that accurately portrays the purpose and content of your channel, enticing potential viewers.
3. Source URL: The Source URL serves as a direct link for viewers to access the livestream.
4. Generating Channel Links: Clicking on "Generate a channel" will generate links to broadcast using the Mext broadcasting system.
5. Using External Broadcasting Systems: If you wish to use alternative systems like YouTube or Twitch for broadcasting, manually add the RTMP URL of the respective system to the "Broadcast URL" field. Additionally, insert the stream key links of the chosen system into the "Broadcast stream key" field.
6. Channel Creation and Management: Once the necessary information is provided, your new channel will be created. You can then edit and update the channel information as needed. Multiple channels can be created to accommodate different content or sessions.
Channel vs. Stages (Video meetings or any other gathering to be broadcasted):
1. 1 Channel, 1 Stage: A single channel is dedicated to hosting one stage (video meeting).
2. 1 Channel, 1 Stage : To organize a multichannel setup, contact Mext for assistance after setting up a channel and stage meeting at contact@mext.app.
3. X Channels, X Meetings: You have the flexibility to create multiple channels and corresponding meetings based on your requirements.
Always ensure that your channel has the correct URL and stays synchronized with the meeting streaming interface to provide a seamless viewing experience for your audience.
What are the steps to create a live session?
To create a live session for your channel, follow these steps:
1. Access the "Video Meeting" section.
2. Click on "Add new meeting" to initiate the creation process.
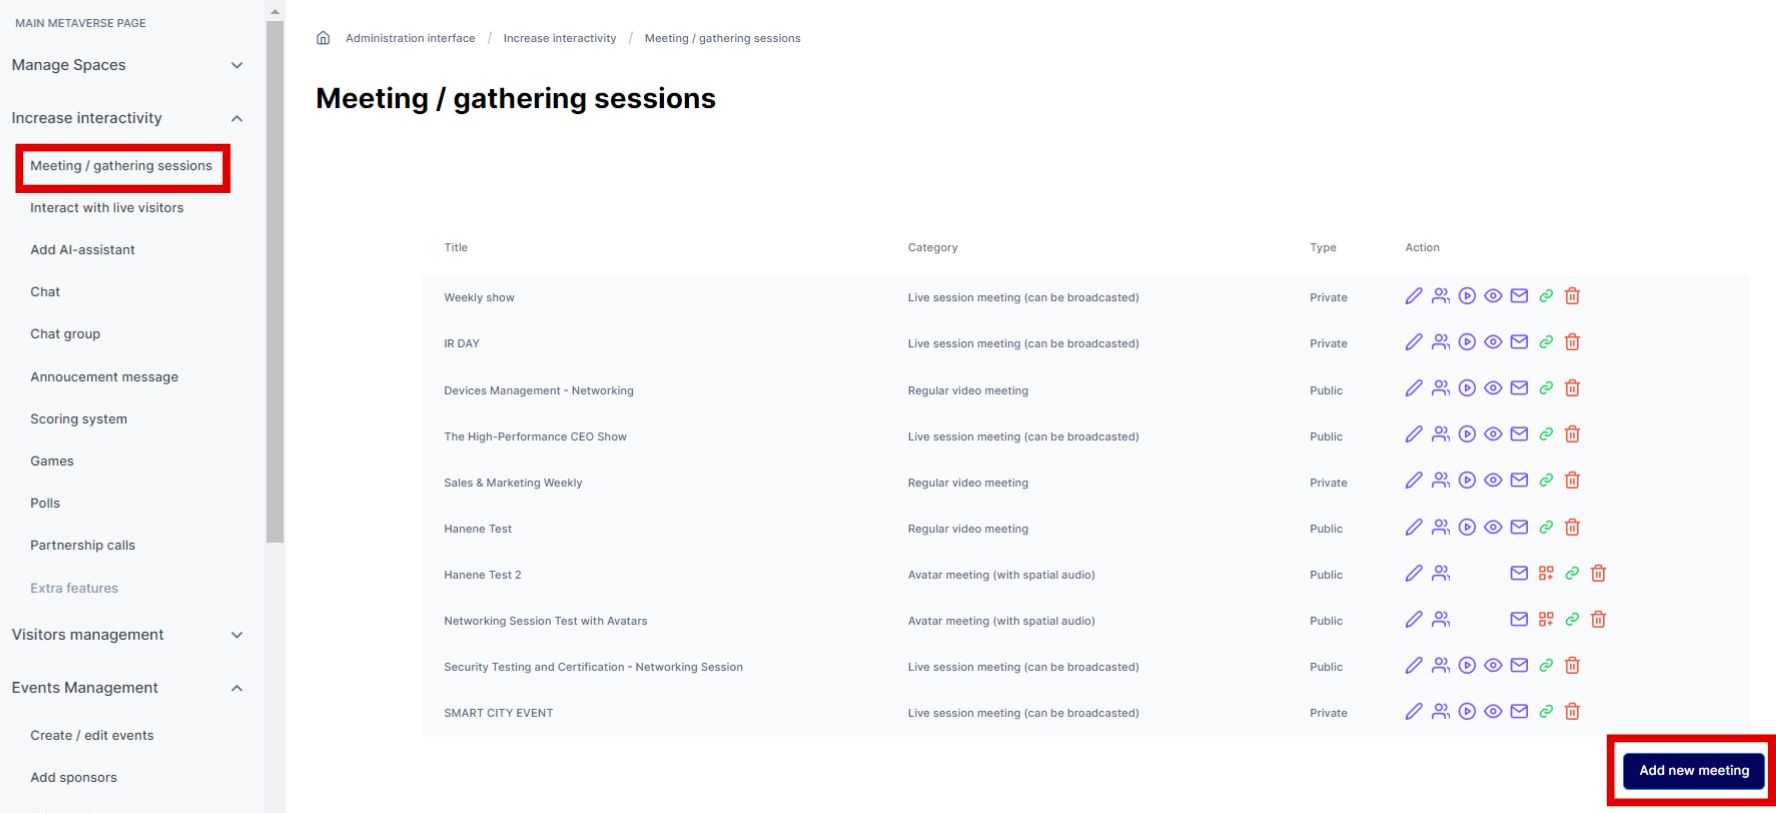
3. Fill in the details to create a new meeting:
o Enter a descriptive name for the session in the "Name" field.
o Keep the meeting private to restrict access.
o Select "Live session" as the category for the meeting.
o Choose the corresponding event name from the Event list. Note that the event should be created prior to setting up the live session.
4. After creating the video meeting (live session stage), you can invite speakers, panelists, and moderators. Only individuals who are invited to the stage will have access to enter the meeting.
How do I initiate a live broadcast?
To initiate your live broadcast after setting up your channel and meeting/stage as described earlier, follow these steps:
1. Assign a Moderator: Designate a moderator for each live session. The moderator will have access to the meeting/stage.
2. Moderator Access: The assigned moderator should log in and access the live session meeting/stage.
3. Opening the Broadcasting Window: Within the meeting/stage interface, the moderator should locate the three dots (…) and click on them to open the following window:
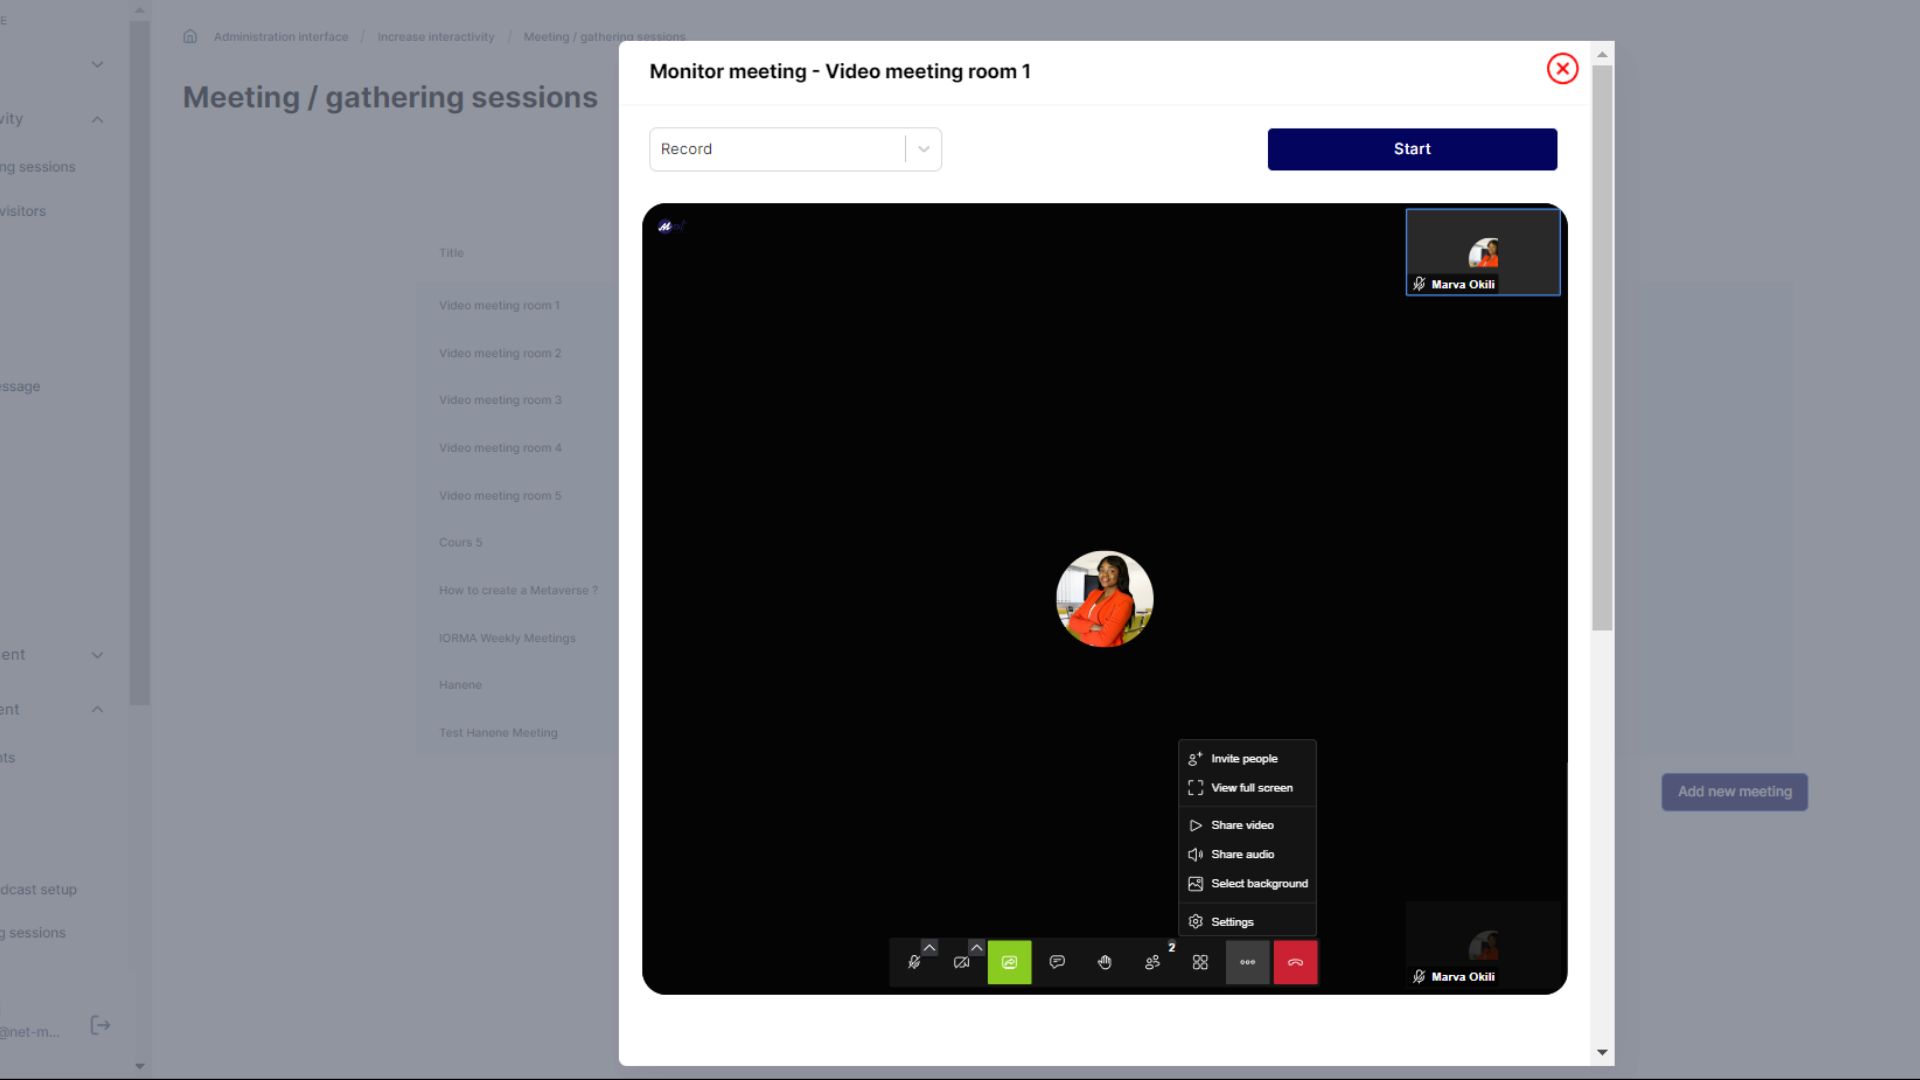
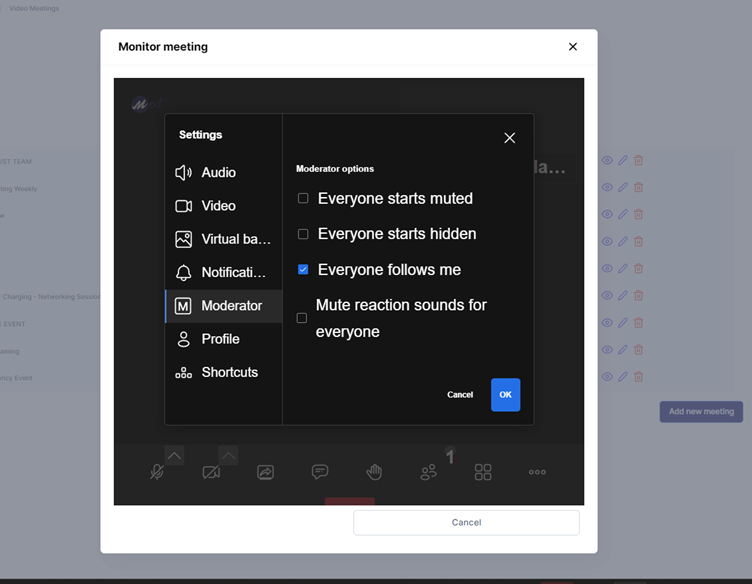
For your convenience, it is recommended to utilize the full-screen mode before proceeding. Once in full-screen mode, click on the "Settings" option. 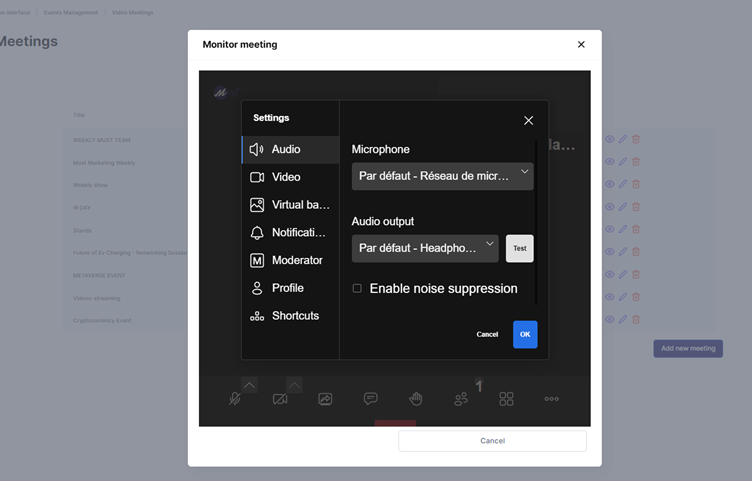 Additionally, ensure that the moderator clicks on "Moderator" and selects the option "everyone follow me". After making this selection, the moderator should confirm by clicking "OK" to validate their role as the moderator. This step ensures that the moderator's status is recognized and acknowledged within the live session.
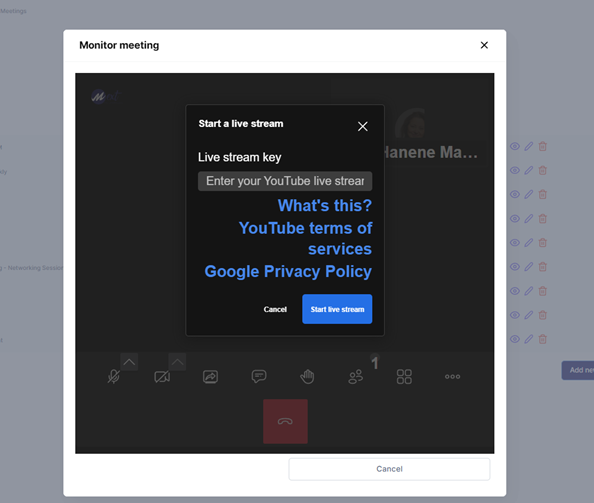
Next, click on "Start Livestream" to initiate the configuration process for your livestream. This action will allow you to begin setting up and configuring the necessary parameters for your livestream broadcast.
To configure the livestream settings, follow these instructions:
1. Copy the "rtmp\://user\:password\@channel/key" from your Metaverse TV/Channel. This will be used for the broadcasting setup.
2. Paste the copied link into the "Broadcast URL" field.
3. If you wish to record the session, add "/record" to the end of the above link. For example:
- Original link: rtmp\://user\:password\@channel/key
- Recording link: rtmp\://user\:password\@channel/key/record
If you prefer to broadcast to YouTube, follow these steps:
1. Enter the following URL in the "Broadcast URL" field: rtmp\://a.rtmp.youtube.com/live2/key.
2. Note that the recording will be handled by YouTube when broadcasting to their platform.
By following these guidelines, you can configure the livestream settings accordingly, whether you intend to record the session or broadcast it to YouTube.
Before going live, especially for your first broadcasting session, it is crucial to thoroughly test the livestream functionality multiple times. Even for subsequent sessions, it is advisable to conduct testing to ensure a smooth and reliable livestream experience.
To enhance the waiting experience for participants, consider incorporating a Splash screen. The moderator can easily share a slide or graphic that can be broadcasted while attendees wait for the meeting to commence. This adds a professional touch and keeps the audience engaged during the pre-meeting period.
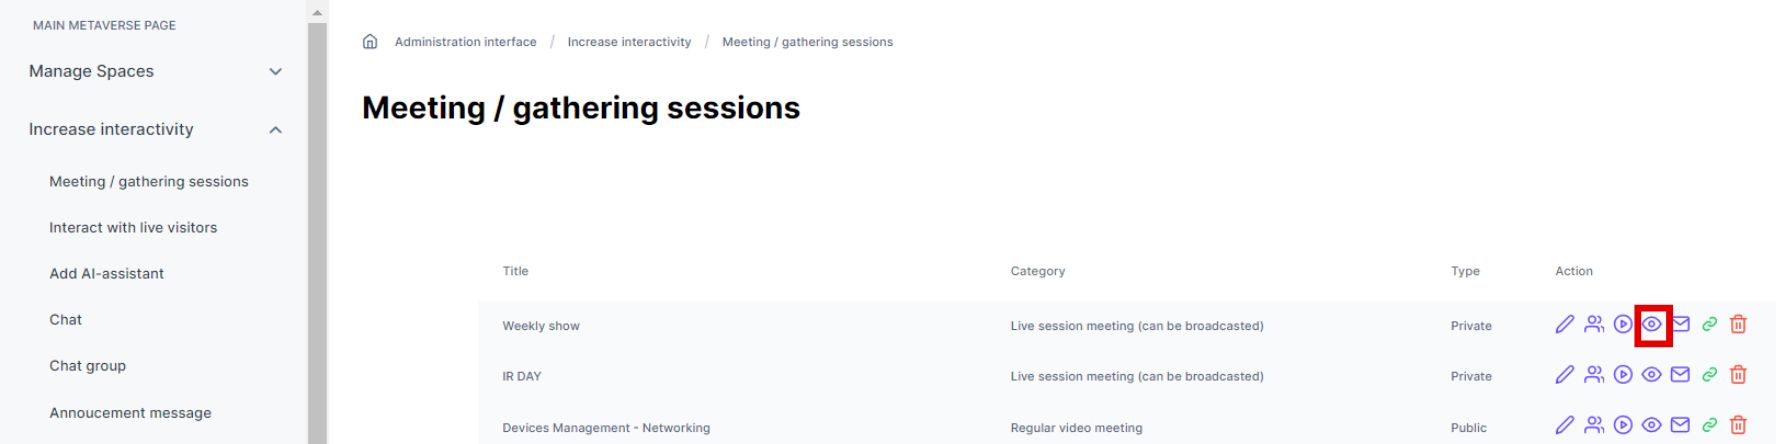
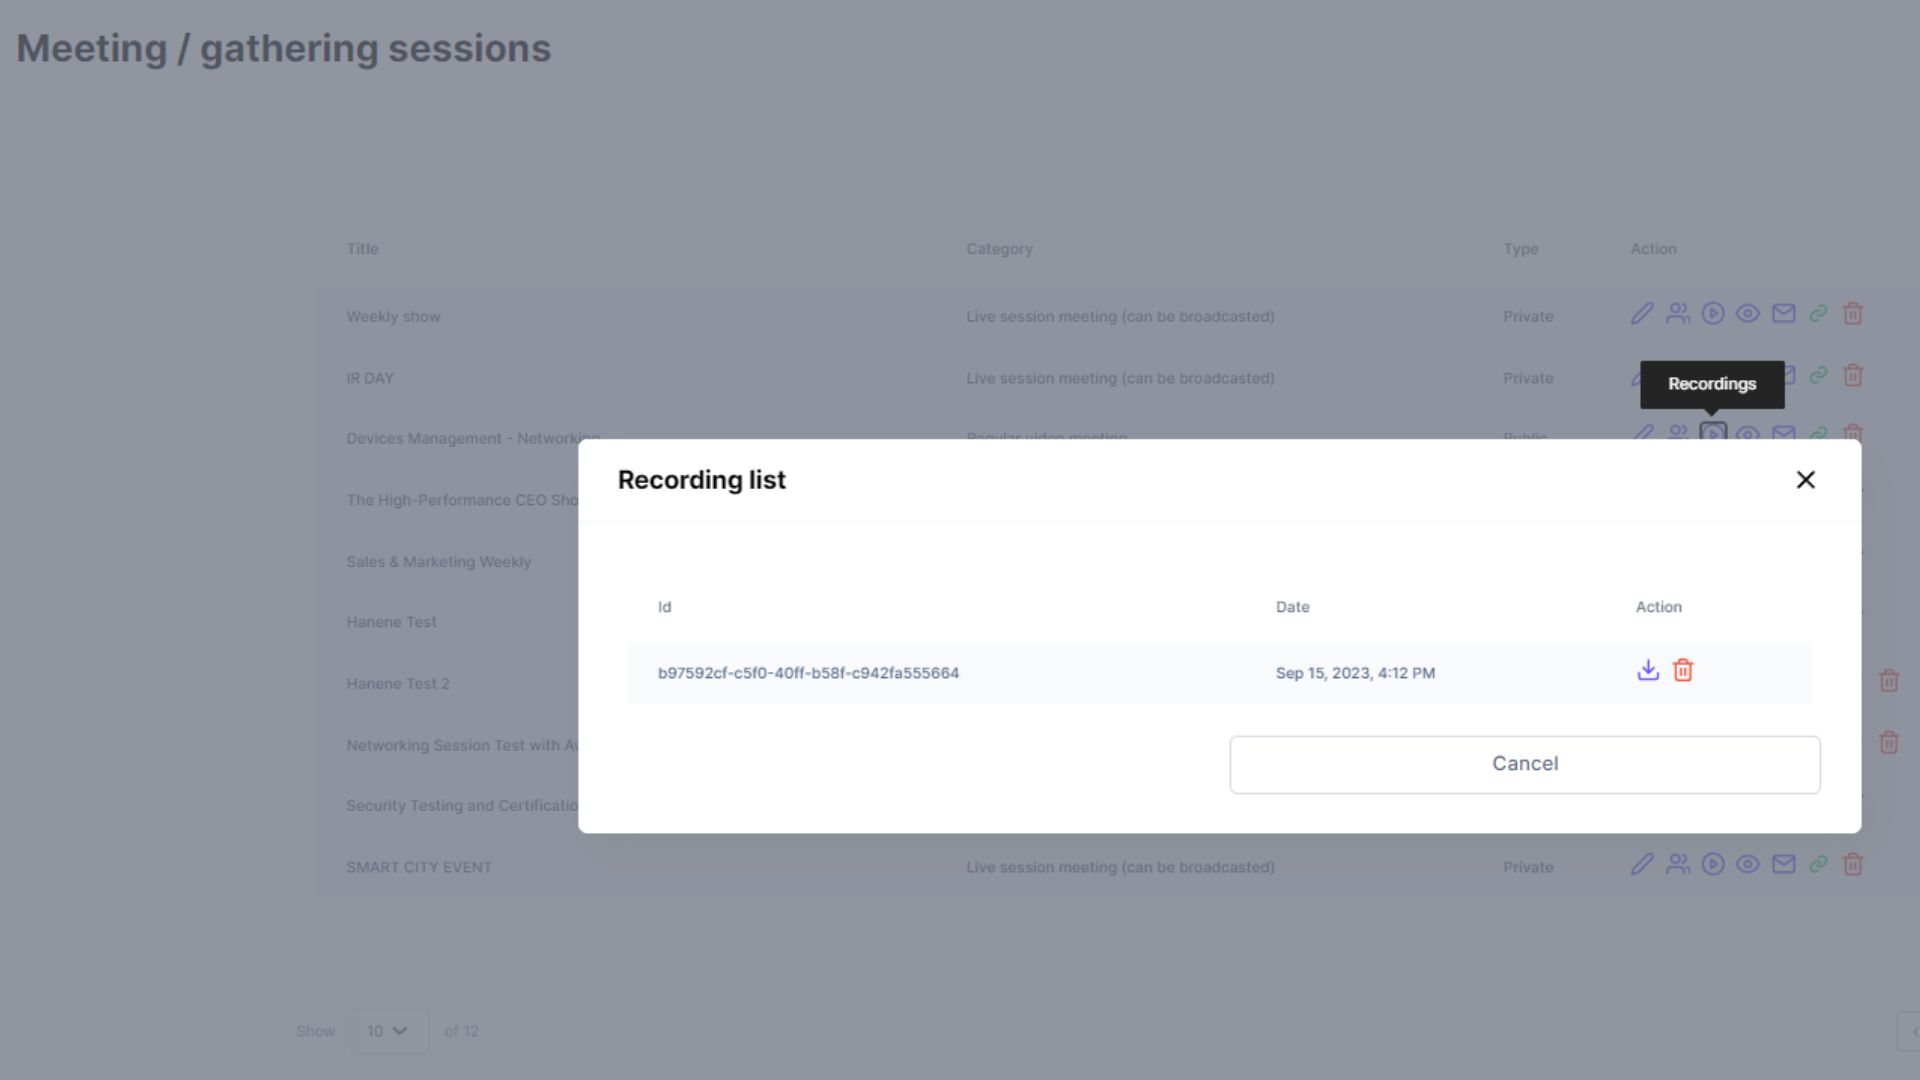
How can I record my session and access replays?
As mentioned earlier, it is essential to configure your livestream link with "/record" if you wish to enable recording. However, please note that when you initiate the livestream by clicking on "Start Live," you cannot simultaneously use the "Start Recording" function. These actions are mutually exclusive.
Once the session concludes, you can conveniently upload your recording file from the Video/Meeting List. Simply locate the corresponding meeting, and click on the second icon available to initiate the upload process. This streamlined approach allows you to efficiently manage and share your recorded content.
How do I stream a pre-recorded video during a live session?
To broadcast a pre-recorded video, such as a pre-recorded conference session, speaker's presentation, or video advertisement during breaks, follow these steps:
1. Access the stage (Moderator and speakers' meeting) where the livestream will take place.
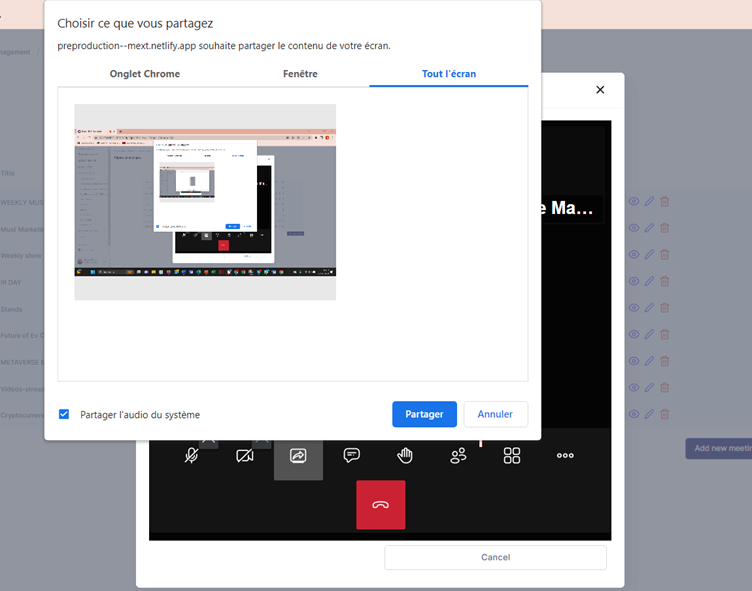
2. Once inside the meeting, utilize the screen sharing feature to share the pre-recorded video.
3. Start playing the pre-recorded video on your local device.
4. The shared video will be broadcasted to the participants, allowing them to view the pre-recorded content as part of the livestream experience.
By following these steps, you can seamlessly incorporate pre-recorded videos into your livestream, providing valuable content and enhancing the overall engagement of your audience.
Ensure that you have a readily available link for your video before proceeding. To share the pre-recorded video during the livestream, you have two options:
1. Share the Video Link: Share the link directly with the participants, allowing them to access the video externally. This method works well when the participants can watch the video on their own devices.
2. Screen Sharing: Alternatively, you can share your screen during the livestream. Opt for the "Full screen" option and ensure that the audio is also included in the screen sharing. This way, participants can watch the video directly from your screen while also hearing the accompanying audio.
These options provide flexibility in incorporating pre-recorded videos into your livestream, ensuring a seamless and engaging experience for your audience.
.